No products
Pegatinas de servicio en la tienda en línea AutomotiveServiceStickers.com
"Nuestras pegatinas de servicio automotriz son más que simples etiquetas de servicio; son el corazón de nuestro compromiso con el bienestar de su vehículo. Diseñadas como un sistema asequible y altamente efectivo para marcar su querido automóvil después de cada servicio, nuestras pegatinas se han convertido en un compañero de confianza para los mecánicos de automóviles en toda Europa.
Lo que nos distingue es que no solo ofrecemos estas pegatinas; las utilizamos nosotros mismos para dar servicio a los automóviles y las hemos puesto a prueba en las condiciones más desafiantes. A través de rigurosas pruebas de laboratorio, hemos asegurado que nuestras etiquetas adhesivas resisten los elementos más duros, ya sea un calor abrasador, un frío glacial, una alta humedad y mucho más.
Lamentablemente, actualmente nuestro proceso de pedido solo está disponible en inglés. Hemos tomado esta decisión para simplificar nuestra tienda en línea y brindarle el mejor servicio posible. Tenga la seguridad de que cuando elige AutomotiveServiceStickers, no está eligiendo solo una etiqueta; está eligiendo un compañero en el viaje de su automóvil, dedicado a su longevidad y rendimiento."
En el ámbito de habla española, actualmente tenemos pegatinas para cambios de aceite con mayor frecuencia y estamos planeando más, como la pegatina para el reemplazo de la correa de distribución.
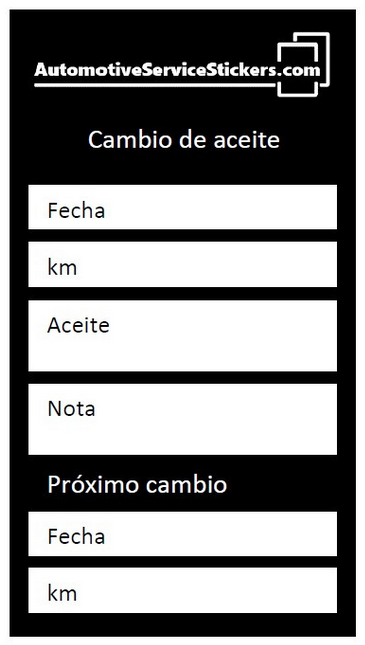
Aquí está la página con las pegatinas para cambios de aceite.
Las pegatinas de servicio para automóviles en la tienda en línea AutomotiveServiceStickers.com son etiquetas informativas utilizadas para registrar cambios de aceite, cambios de líquidos de funcionamiento o cambios de componentes importantes, como la correa de distribución.
Todos estos adhesivos están diseñados para resistir influencias ambientales como la temperatura, la humedad, el agua o el daño mecánico. Estas propiedades fueron probadas y verificadas de acuerdo con estándares técnicos. Siguiendo el procedimiento de uso, estas etiquetas son una opción duradera y económica para marcar el automóvil de cara a futuras inspecciones técnicas y cambios de líquidos de funcionamiento, aceites u otros componentes importantes del automóvil.
%20Obr%C3%A1zek%20uk%C3%A1zka%20na%20vozu%20wide.jpg)
También puedes leer este artículo en estos idiomas: Deutsch, Français
-:
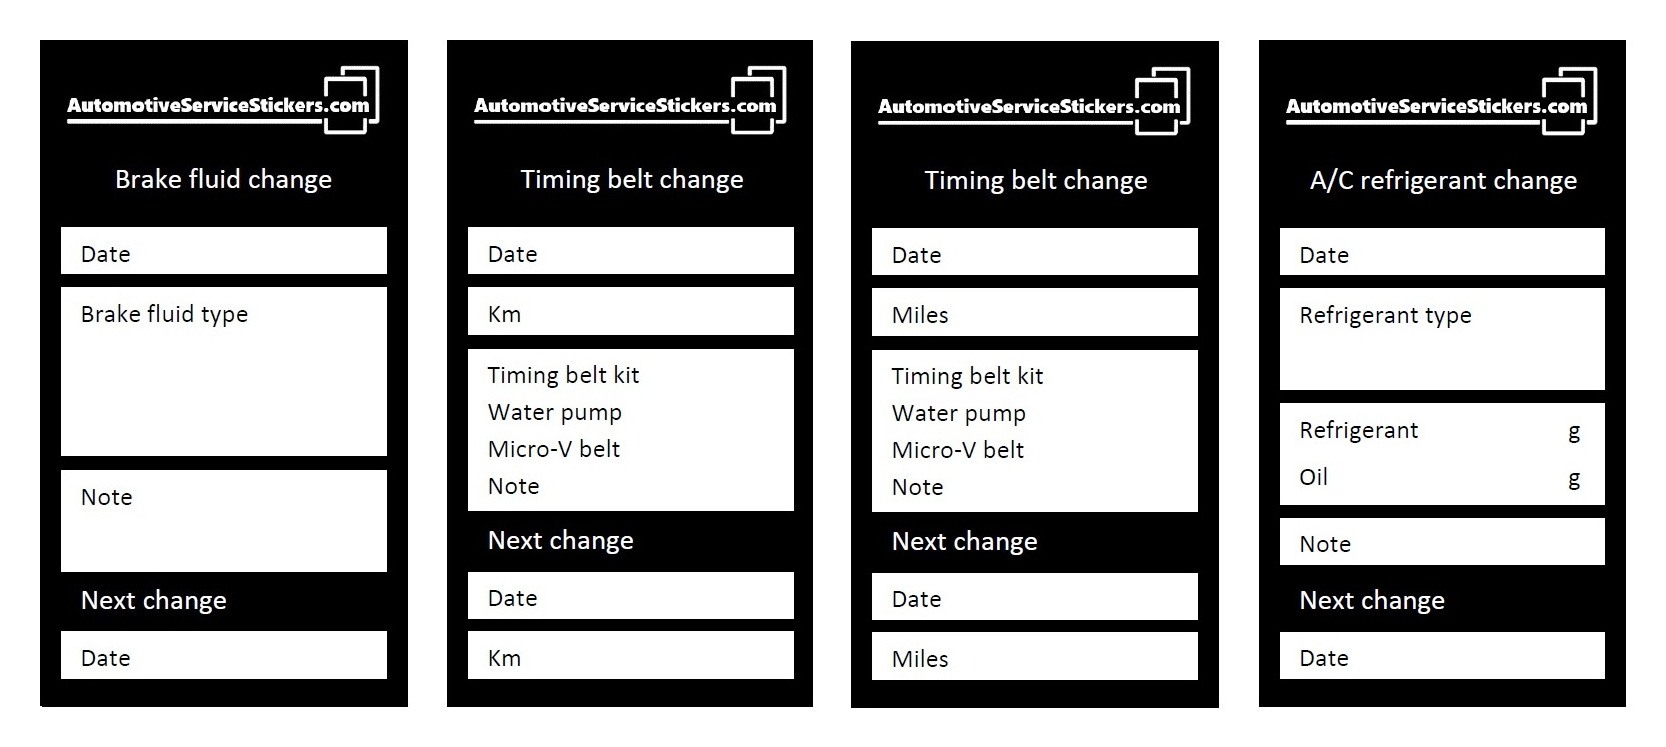
Types of service stickers
-
Motor oil change stickers in kilometers or miles
-
Gear oil change stickers in kilometers or miles

-
Brake fluid change stickers
-
Timing belt change stickers in kilometers or miles
-
A/C refrigerant change stickers
-
How to use these service stickers
To make the sticker waterproof and long-term durable it must be covered by protective tape. Protective tape for the service sticker is available to buy here.
Please follow the steps below on how to cover the sticker with protective tape. It is important to follow the procedure. Protective tape protects the surface and information written on the service sticker by pen.
Place the service sticker only to metal parts of the car. For example, in engine space, hood or to lower door pillar. You can find examples of placement of the stickers below.
Service sticker properties:
Service sticker covered by protective tape and placed to metal parts of car has these properties:
- Operating temperature -40°C to +80°C:
- Comply with standard IEC 60068-2-1: Cold -40°C/16h
- Comply with standard IEC 60068-2-2: Dry heat +80°C/16h
- Resistant to humidity and water
- Resistant to mechanical damage
Service sticker covered with protective tape and placed to the metal surface is suitable for long-term intervals.
Instructions how to cover stickers by protective tape:
![]()
1.Write information on a sticker with a pen.
2. Place the sticker on any paper. Stick the end of the protective tape to the edge of a table. Unwind 20 cm of tape.
3. Use any card from your wallet and press firmly on the tape at the beginning of the service sticker.
4. Swipe the tape with the card. Start from the beginning of the label and continue to the end in one stroke. It is necessary to use the card. Otherwise, air bubbles can appear.
5. Cut the excessive protective tape with scissors.
6. Stick the sticker on a car.
Examples of application:
%20Obr%C3%A1zek%20uk%C3%A1zka%20na%20vozu.jpg)
Removing the sticker from the metal parts of car:
Remove protective tape first.
Dampen the sticker with hot water, let it soak for a while, later the paper part can be easily removed.
The last part of the sticker is glue. Use a brake cleaner to remove any remaining glue residue.
You can also place a new sticker on the previous sticker. Then you do not have to remove the old one.