No products
 View larger

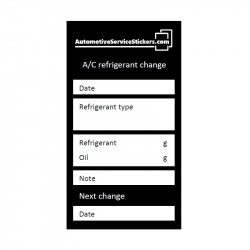
A/C refrigerant change sticker 20 pieces
AE-00014-S
New product
A/C refrigerant change sticker
Informative A/C air conditioning refrigerant change sticker
Number of pieces in package: 20
Sticker dimensions: 90mm x 50mm
Self-adhesive paper sticker
For information on how to make sticker waterproof and long-term durable please read the instructions below.
9 Items
In stock
More info
Instructions for use:
To make the sticker waterproof and long-term durable it must be covered by protective tape. Protective tape for the service sticker is available to buy here.
Please follow the steps below on how to cover the sticker with protective tape. It is important to follow the procedure. Protective tape protects the surface and information written on the service sticker by pen.
Place the service sticker only to metal parts of the car. For example, in engine space, hood or to lower door pillar. You can find examples of placement of the stickers below.
Service sticker properties:
Service sticker covered by protective tape and placed to metal parts of car has these properties:
- Operating temperature -40°C to +80°C:
- Comply with standard IEC 60068-2-1: Cold -40°C/16h
- Comply with standard IEC 60068-2-2: Dry heat +80°C/16h
- Resistant to humidity and water
- Resistant to mechanical damage
Service sticker covered with protective tape and placed to the metal surface is suitable for long-term intervals.
Instructions how to cover stickers by protective tape:
![]()
1.Write information on a sticker with a pen.
2. Place the sticker on any paper. Stick the end of the protective tape to the edge of a table. Unwind 20 cm of tape.
3. Use any card from your wallet and press firmly on the tape at the beginning of the service sticker.
4. Swipe the tape with the card. Start from the beginning of the label and continue to the end in one stroke. It is necessary to use the card. Otherwise, air bubbles can appear.
5. Cut the excessive protective tape with scissors.
6. Stick the sticker on a car.
Examples of application:
%20Obr%C3%A1zek%20uk%C3%A1zka%20na%20vozu.jpg)
Removing the sticker from the metal parts of car:
Remove protective tape first.
Dampen the sticker with hot water, let it soak for a while, later the paper part can be easily removed.
The last part of the sticker is glue. Use a brake cleaner to remove any remaining glue residue.
You can also place a new sticker on the previous sticker. Then you do not have to remove the old one.
Keywords: klistermærke til udskiftning af kølemiddel, udskiftning af kølemiddel, kliimaseadme külmutusagensi vahetamise kleebis, kliimaseadme külmutusagensi vahetus, ilmastointilaitteen kylmäaineen vaihtotarra, ilmastointilaitteen kylmäaineen vaihto, autocollant de changement de réfrigérant de climatisation, changement de réfrigérant de climatisation, Klimaanlage Kältemittelwechselaufkleber, Kältemittelwechsel der Klimaanlage, air conditioning refrigerant change sticker, A/C refrigerant change sticker, A/C air conditioning refrigerant change, adesivo cambio refrigerante aria condizionata, cambio refrigerante aria condizionata, gaisa kondicionētāja dzesētāja mainīšanas uzlīme, gaisa kondicionētāja dzesēšanas šķidruma maiņa, oro kondicionieriaus šaltnešio keitimo lipdukas, oro kondicionavimo šaltnešio keitimas, Klimaanlag Killmëttel Wiessel Sticker, Klimaanlag Killmëttel Wiessel, airconditioning koelmiddel vervangen sticker, airconditioning koelmiddel verversen, adesivo de troca de refrigerante de ar condicionado, troca de refrigerante de ar condicionado, nalepka za zamenjavo hladilnega sredstva na klimatski napravi, menjava hladilnega sredstva v klimatski napravi, etiqueta de cambio de refrigerante de aire acondicionado, cambio de refrigerante del aire acondicionado.
3 other products in the same category:
-
Protective...
2,00 €
-

A/C...
7,00 €
-
A/C...
12,00 €